
스프링부트 사용 시 Tomcat 의존성이 추가되는 원리
DESCRIPTION
Spring AOP에 대해 공부하던 중, Spring-Transaction 디펜던시의
@Transactional 어노테이션도 횡단 관심사로써 서비스 코드 전반에 걸쳐 적용되어 AOP를 사용하는 것일텐데, 어떠한 방식으로 적용이 되는지 의문이 들어 해당 내용에 대해 찾아보기 시작하였다. 이는 스프링의 빈 등록 방식과 빈 후처리기(BeanPostProcessor)과 연관이 있었고, 이를 알아보기 위해 스프링의 빈이 등록되는 과정을 찾아 보게 되었다. 그 중 Tomcat 의존성이 어떠한 방식으로 추가되며, 이를 통해 단순 Servlet 애플리케이션과 Reactive 애플리케이션이 어떠한 원리로 분리되어 의존성을 주입받게 되는지에 대한 원리를 알아보고자 한다.
서론
Spring AOP에 대해 공부하던 중, spring-transaction 디펜던시의 @Transactional 어노테이션의 적용 방법에 대한 의문이 들었다. 트랙잭션은 횡단 관심사로써 서비스 코드 전반에 걸쳐 적용된다. 따라서, AOP를 사용하는 것일텐데 단순 @Aspect 어노테이션으로 구성되어 있지 않음에도 어떤 식으로 AOP가 적용이 되며, 프록시 객체는 어떻게 생기는가에 대한 궁금증이 생겼다.
이 과정을 알기 위해서는 스프링 빈 등록 방식과 빈 후처리기(Bean PostProcessor)가 연관이 있다는 것을 알게 되었고, 스프링의 빈이 등록되는 과정을 찾아 보게 되었다. 그 중 Tomcat 관련 클래스들이 로드되고, Reactive 애플리케이션의 Jetty 관련 클래스들은 로드되지 않는다는 점을 발견하였다. 처음에는 “해당 클래스 파일이 없는데 애플리케이션이 실행이 가능한가?” 에 대한 근본적인 의문이 들게 되었고, 해당 과정을 따로 정리해보기로 하였다.
@Transactional어노테이션이 처리되고, 프록시 객체가 만들어지는 과정은 이후 포스팅에서 서술하고자 한다.
SpringBoot Application의 특징
SpringBoot 공식 문서를 참고하면 SpringBoot는 아래와 같은 특징을 가지고 있다고 한다.
Feature
- Embed Tomcat, Jetty or Undertow directly (no need to deploy WAR files)
- Provide opinionated ‘starter’ dependencies to simplify your build configuration
스프링 부트는 Tomcat, Jetty 또는 Undertow와 같은 WAS(서블릿 컨테이너)들을 내장하고 있다. 기존에 스프링부트같은 내장 서버를 가진 기술이 없을 때는 빌드 후 WAS에 .war 파일을 내장시켜 구동하는 방식을 사용했었다.
적은 메모리 사용량과 논블로킹 지원 등 다른 컨테이너에도 여러가지 특징이 있지만 기본적으로 가장 흔히 사용되는 서블릿 컨테이너는 Tomcat이다. 즉, 어떠한 원리에 의해 스프링부트는 기본적으로 Tomcat을 사용하여 서블릿 애플리케이션을 구축한다. 따라서, 스프링 부트 애플리케이션의 시작부터 웹 서버가 만들어지는 과정을 간략하게 알아보고자 한다.
SpringApplication.run()
스프링부트 프로젝트는 XXXApplication 클래스의 SpringApplication.run(...) static 메서드를 호출하며 애플리케이션이 시작된다.
import org.springframework.boot.SpringApplication;
import org.springframework.boot.autoconfigure.SpringBootApplication;

@SpringBootApplication
public class YeogigaApplication {

   public static void main(String[] args) {
      SpringApplication.run(YeogigaApplication.class, args);
   }

}
여기서 @SpringBootApplication과 SpringApplication 모두 org.springframework.boot 패키지에 속한 클래스로 스프링 부트에서 제공하는 클래스임을 알 수 있다. 해당 코드가 따로 .war 파일을 WAS에 넣어 구동할 필요없이 단순히 .jar 파일 안에 내장 서버를 위치시키고 애플리케이션을 구동되도록 해주는 것이다.
package org.springframework.boot;

public class SpringApplication {
   // 1번째 호출
   public static ConfigurableApplicationContext run(Class<?> primarySource, String... args) {
      return run(new Class[]{primarySource}, args);
   }

   // 2번째 호출
   public static ConfigurableApplicationContext run(Class<?>[] primarySources, String[] args) {
      return (new SpringApplication(primarySources)).run(args);
   }
}
SpringApplication 내에 run(...) 메서드는 총 3가지로 구성되어있으며 순차적으로 호출된다.
처음 호출하는 static run(...) 메서드는 인자로 전달받은 루트 클래스를 Class 배열로 감싸고, 인수들을 넘겨주는 역할이다.
다음으로 호출하는 static run(...) 메서드는 SpringApplication 인스턴스를 만들고, 인스턴스 메서드인 .run(args)를 실행하는 역할을 담당한다.
public ConfigurableApplicationContext run(String... args) {
   Startup startup = SpringApplication.Startup.create();
   if (this.registerShutdownHook) {
      shutdownHook.enableShutdownHookAddition();
   }

   DefaultBootstrapContext bootstrapContext = this.createBootstrapContext();
   ConfigurableApplicationContext context = null;
   this.configureHeadlessProperty();
   SpringApplicationRunListeners listeners = this.getRunListeners(args);
   listeners.starting(bootstrapContext, this.mainApplicationClass);

   try {
      ApplicationArguments applicationArguments = new DefaultApplicationArguments(args);
      ConfigurableEnvironment environment = this.prepareEnvironment(listeners, bootstrapContext, applicationArguments);
      Banner printedBanner = this.printBanner(environment);

      context = this.createApplicationContext(); // (1) ApplicationContext 객체를 생성
      context.setApplicationStartup(this.applicationStartup);

      this.prepareContext(bootstrapContext, context, environment, listeners, applicationArguments, printedBanner);

      this.refreshContext(context); // (2) 빈들을 찾아서 등록하고, 웹 서버를 만들어서 실행하는 등의 핵심 로직 수행

      this.afterRefresh(context, applicationArguments);
      startup.started();
      if (this.logStartupInfo) {
            (new StartupInfoLogger(this.mainApplicationClass)).logStarted(this.getApplicationLog(), startup);
      }

      listeners.started(context, startup.timeTakenToStarted());
      this.callRunners(context, applicationArguments);
   } catch (Throwable var10) {
      throw this.handleRunFailure(context, var10, listeners);
   }

   try {
      if (context.isRunning()) {
            listeners.ready(context, startup.ready());
      }

      return context;
   } catch (Throwable var9) {
      throw this.handleRunFailure(context, var9, (SpringApplicationRunListeners)null);
   }
}
해당 코드에서 현재 주목해야할 부분은 (1) ApplicationContext를 생성하는 부분과 (2) 빈들을 찾아서 등록하고, 웹 서버를 만들어서 실행하는 로직을 수행하는 부분이다.
(1) ApplicationContext 생성
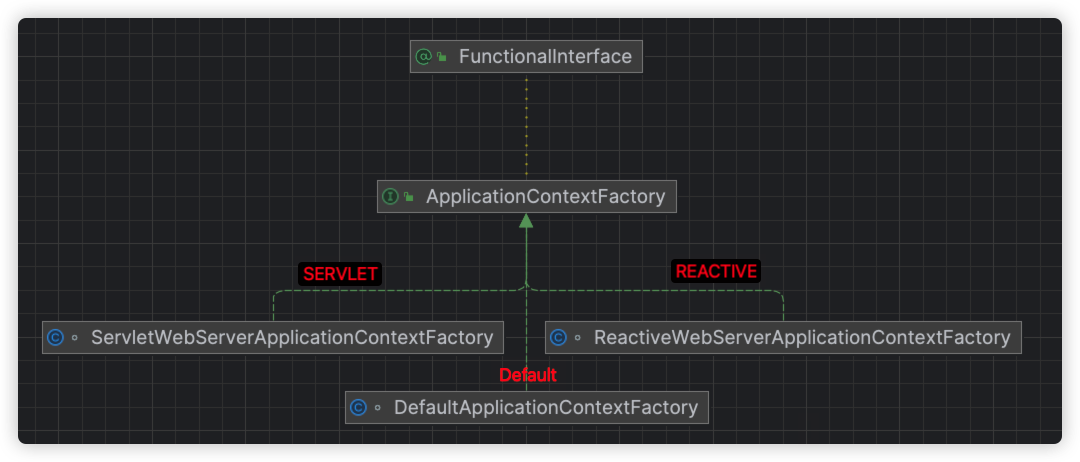
먼저, WebApplicationType webApplicationType enum을 통해서 ApplicationContextFacotry를 결정하게 된다. WebApplicationType은 classpath를 기준으로 특정 클래스가 존재하는지 등의 여부 등을 확인해 해당 애플리케이션의 타입을 결정한다. 타입에는 크게 REACTIVE, NONE, SERVLET이 있다.
이 때, springboot-starter-web을 사용한 프로젝트일 경우 일반적으로 SERVLET 타입이 선택되게 된다.
이 WebApplicationType에 따라 ApplicationContextFacotry 구현체를 생성하게 된다.
public class SpringApplication {
   public SpringApplication(ResourceLoader resourceLoader, Class<?>... primarySources) {
      // ...
      this.applicationContextFactory = ApplicationContextFactory.DEFAULT;
   }

   /* ... */
}
@FunctionalInterface
public interface ApplicationContextFactory {
   ApplicationContextFactory DEFAULT = new DefaultApplicationContextFactory();

    /* ... */
}
SpringApplicaiton에서는 applicationContextFacotry 필드에 기본적으로 DefaultApplicationContextFacotry를 사용하고 있다.
ApplicationContextFactory는 말 그대로 ApplicationContext를 만들어내는 역할을 담당하는 클래스이다.
DefaultApplicationContextFactory.create(WebApplicationType webApplicationType)의 역할은 다른 ApplicationContextFactory의 구현체들의 create(WebApplicationType)을 호출하는 중개자이다.
이 때, 웹 애플리케이션 타입에 따라 적절한 ApplicationContext를 반환하는 것이다.
// DefaultApplicationContextFactory
public ConfigurableApplicationContext create(WebApplicationType webApplicationType) {
   try {
      return (ConfigurableApplicationContext)this.getFromSpringFactories(webApplicationType, ApplicationContextFactory::create, this::createDefaultApplicationContext);
   } catch (Exception var3) {
      throw new IllegalStateException("Unable create a default ApplicationContext instance, you may need a custom ApplicationContextFactory", var3);
   }
}

private <T> T getFromSpringFactories(WebApplicationType webApplicationType, BiFunction<ApplicationContextFactory, WebApplicationType, T> action, Supplier<T> defaultResult) {
   // 모든 .jar 파일의 META-INF/spring.factories 파일을 읽어 ApplicationContextFacotry.class의 구현 클래스들을 불러옴
   Iterator var4 = SpringFactoriesLoader.loadFactories(ApplicationContextFactory.class, this.getClass().getClassLoader()).iterator();

   Object result;
   do {
      if (!var4.hasNext()) {
            return defaultResult != null ? defaultResult.get() : null;
      }

      ApplicationContextFactory candidate = (ApplicationContextFactory)var4.next();
      result = action.apply(candidate, webApplicationType);
   } while(result == null);

   return result;
}
# spring-boot/META-INF/spring.factories

# Application Context Factories
org.springframework.boot.ApplicationContextFactory=\
org.springframework.boot.web.reactive.context.ReactiveWebServerApplicationContextFactory,\
org.springframework.boot.web.servlet.context.ServletWebServerApplicationContextFactory
모든 .jar 파일의 META-INF/spring.factories 파일에 등록된 목록 중 ApplicationContextFactory 구현체들을 불러와 해당 클래스의 create(WebApplicationType)을 호출해 특정 WebApplicationType을 처리할 수 있는지 확인한다.
spring-boot 디펜던시의 META-INF/spring.factories 파일을 보면 ApplicationContextFactory의 구현체인 2개의 클래스가 명시되어 있는 것을 확인할 수 있다.
ReactiveWebServerApplicationContextFactoryServletWebServerApplicationContextFactory
즉, 기본적으로 해당 두 클래스들을 순회하며 .create(WebApplicationType)을 호출하는 것이다. 따라서, DefaultApplicationContextFactory도 ApplicationContextFactory의 구현체이지만 spring.factories 파일에는 정의되어 있지 않기 때문에 재귀적으로 호출되지는 않는다.
// ReactiveWebServerApplicationContextFactory
public ConfigurableApplicationContext create(WebApplicationType webApplicationType) {
   return webApplicationType != WebApplicationType.REACTIVE ? null : this.createContext();
}
// ServletWebServerApplicationContextFactory
public ConfigurableApplicationContext create(WebApplicationType webApplicationType) {
   return webApplicationType != WebApplicationType.SERVLET ? null : this.createContext();
}

private ConfigurableApplicationContext createContext() {
   return (ConfigurableApplicationContext)(!AotDetector.useGeneratedArtifacts()
            ? new AnnotationConfigServletWebServerApplicationContext() // => 선택
            : new ServletWebServerApplicationContext());
}
각 애플리케이션 컨텍스트 팩토리 클래스에서 webApplicaitonType의 일치 여부를 판단해 ApplicationContext 구현체를 생성해 반환한다. 우리는 기본적으로 SERVLET 타입의 애플리케이션을 구동한다.
또한, 결과적으로 AnnotationConfigServletWebServerApplicationContext가 응답되어 이후 빈 생성 및 등록, 조회 등의 작업을 위임받아 사용하게 되는 것이다.
여담이지만, Spring의 빈 생성 과정이나 SpringBoot 기본 설정 과정들을 살펴보면 Factory 클래스를 엄청 많이 사용한다는 것을 느꼈다. 해당 로직을 수행하는 구현체를 만들어내기 위한 중개자 역할의 클래스들이 Factory 클래스로 존재하고, 이를 통해 실제 동작을 수행하는 구현체 인스턴스를 생성하는 경우를 많이 볼 수 있었다.
1) DefaultApplicationContextFactory
2) ServletWebServerApplicationContextFacotry
3) AnnotationConfigServletWebServerApplicationFactory
해당 과정에서 거쳐가고, 생성되는 객체들을 간단하게 정리화면 위와 같다.
(2) 빈 등록 및 웹 서버 생성
// SpringApplication
public ConfigurableApplicationContext run(String... args) {

   // (2) 빈들을 찾아서 등록하고, 웹 서버를 만들어서 실행하는 등의 핵심 로직 수행
   this.refreshContext(context);

   // ...
}

private void refreshContext(ConfigurableApplicationContext context) {
   if (this.registerShutdownHook) {
      shutdownHook.registerApplicationContext(context);
   }

   this.refresh(context);
}

protected void refresh(ConfigurableApplicationContext applicationContext) {
   applicationContext.refresh();
}
그 다음은 빈 등록 및 웹 서버 생성을 담당하는 SpringApplication.refreshContext(context) 부분이다.
웹 서버를 생성할 때 ApplicationContext가 이를 위임받아 웹 서버를 생성하는 역할을 수행한다. 당연히 웹 애플리케이션 타입마다 다른 형태의 서버가 필요할 것이기 때문에 ApplicationContext가 이를 위임받아 수행하는 것이다.
앞서 ApplicationContext 생성 과정과 어떤 컨텍스트를 사용하는지 알아본 이유이기도 하다.
결과적으로 applicationContext.refresh()를 호출하게 된다.
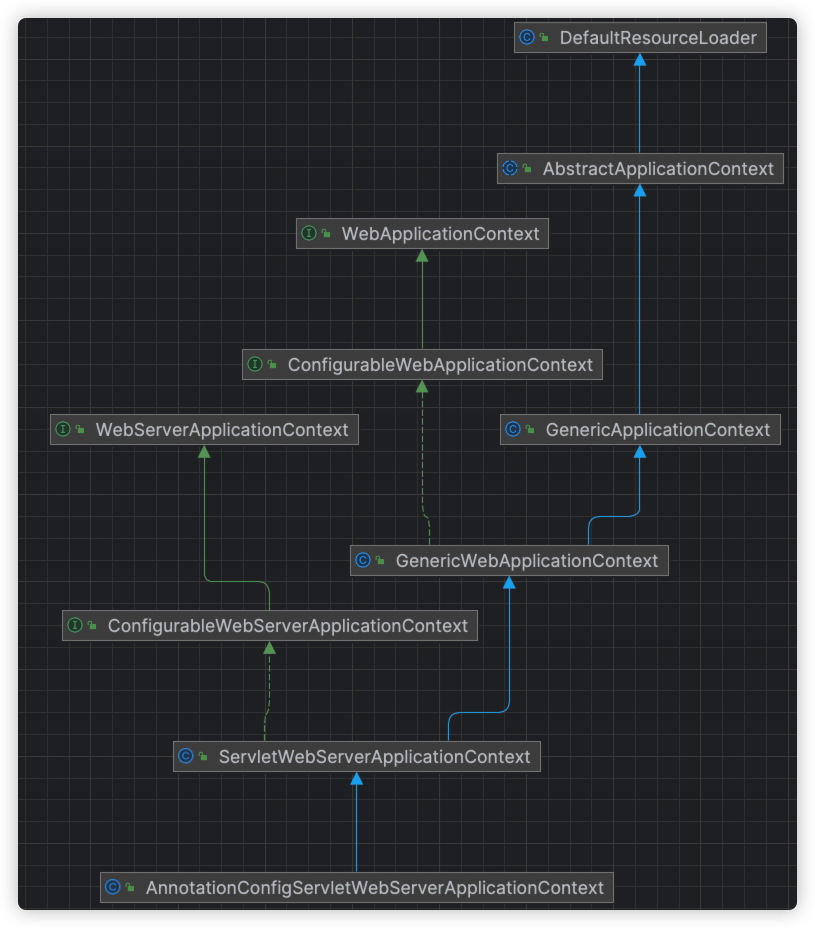
AnnotationConfigServletWebServerApplicationFactory는 위와 같은 계층 구조를 가지고 있다.
이러한 계층 구조를 기반으로 템플릿 메서드 패턴을 사용하여 각 상위 클래스에서 구현된 .refresh()를 하위 클래스에서 오버라이딩하였다. 또한, super.refresh()를 통해 각 ApplicationContext마다 공통으로 적용되는 로직은 상위 클래스에 정의하고, 별도로 적용되어야하는 로직은 하위 클래스에서 구현하였다.
public class ServletWebServerApplicationContext extends GenericWebApplicationContext implements ConfigurableWebServerApplicationContext {

   public final void refresh() throws BeansException, IllegalStateException {
      try {
         super.refresh(); // AbstractApplicationContext.refrsh() 지칭
      } catch (RuntimeException var3) {
         WebServer webServer = this.webServer;
         if (webServer != null) {
               webServer.stop();
               webServer.destroy();
         }

         throw var3;
      }
   }

   /* ... */
}
public abstract class AbstractApplicationContext extends DefaultResourceLoader implements ConfigurableApplicationContext {
   public void refresh() throws BeansException, IllegalStateException {
      this.startupShutdownLock.lock();

      try {
         this.startupShutdownThread = Thread.currentThread();
         StartupStep contextRefresh = this.applicationStartup.start("spring.context.refresh");
         this.prepareRefresh();
         ConfigurableListableBeanFactory beanFactory = this.obtainFreshBeanFactory();
         this.prepareBeanFactory(beanFactory);

         try {
               this.postProcessBeanFactory(beanFactory);
               StartupStep beanPostProcess = this.applicationStartup.start("spring.context.beans.post-process");
               this.invokeBeanFactoryPostProcessors(beanFactory);
               this.registerBeanPostProcessors(beanFactory);
               beanPostProcess.end();
               this.initMessageSource();
               this.initApplicationEventMulticaster();
               this.onRefresh(); // ServletWebServerApplicationContext.onRefrsh()를 지칭, 웹 서버를 생성
               this.registerListeners();
               this.finishBeanFactoryInitialization(beanFactory);
               this.finishRefresh();
         } catch (Error | RuntimeException var12) {
               if (this.logger.isWarnEnabled()) {
                  this.logger.warn("Exception encountered during context initialization - cancelling refresh attempt: " + var12);
               }

               this.destroyBeans();
               this.cancelRefresh(var12);
               throw var12;
         } finally {
               contextRefresh.end();
         }
      } finally {
         this.startupShutdownThread = null;
         this.startupShutdownLock.unlock();
      }

   }
}
AbstractApplicationContext.refersh() 내부에서 this.onRefresh()를 호출하게 된다. 이 때, this는 각 애플리케이션마다 다르게 적용된 하위 클래스를 지칭하며 SERVLET 타입의 애플리케이션은 ServletWebServerApplicationContext.onRefresh()를 호출하게 된다.
public class ServletWebServerApplicationContext extends GenericWebApplicationContext implements ConfigurableWebServerApplicationContext {
   protected void onRefresh() {
      super.onRefresh();

      try {
         this.createWebServer(); // 웹 서버를 생성
      } catch (Throwable var2) {
         throw new ApplicationContextException("Unable to start web server", var2);
      }
   }

   private void createWebServer() {
      WebServer webServer = this.webServer;
      ServletContext servletContext = this.getServletContext();
      if (webServer == null && servletContext == null) {
         StartupStep createWebServer = this.getApplicationStartup().start("spring.boot.webserver.create");
         // 웹 서버 팩토리 객체
         ServletWebServerFactory factory = this.getWebServerFactory();
         createWebServer.tag("factory", factory.getClass().toString());

         // 웹 서버 팩토리 객체로부터 웹 서버 객체를 획득
         this.webServer = factory.getWebServer(new ServletContextInitializer[]{this.getSelfInitializer()});
         createWebServer.end();
         this.getBeanFactory().registerSingleton("webServerGracefulShutdown", new WebServerGracefulShutdownLifecycle(this.webServer));
         this.getBeanFactory().registerSingleton("webServerStartStop", new WebServerStartStopLifecycle(this, this.webServer));
      } else if (servletContext != null) {
         try {
               this.getSelfInitializer().onStartup(servletContext);
         } catch (ServletException var5) {
               throw new ApplicationContextException("Cannot initialize servlet context", var5);
         }
      }

      this.initPropertySources();
   }
}
ServletWebServerApplicationContext.onRefresh()에서 웹 서버를 생성하는 코드를 찾을 수 있다.
onRefresh() → createWebServer() 메서드를 호출하는 구조이며, createWebServer() 내부에서 웹 서버 객체를 생성한다. 이 때도 Factory 클래스를 통해서 웹 서버 객체를 획득하는 형태로 구현되어 있다.
getWebServerFactory()
// ServletWebServerApplicationContext.createWebServer()
ServletWebServerFactory factory = this.getWebServerFactory();
protected ServletWebServerFactory getWebServerFactory() {
   String[] beanNames = this.getBeanFactory().getBeanNamesForType(ServletWebServerFactory.class);
   if (beanNames.length == 0) {
      throw new MissingWebServerFactoryBeanException(this.getClass(), ServletWebServerFactory.class, WebApplicationType.SERVLET);
   } else if (beanNames.length > 1) {
      throw new ApplicationContextException("Unable to start ServletWebServerApplicationContext due to multiple ServletWebServerFactory beans : " + StringUtils.arrayToCommaDelimitedString(beanNames));
   } else {
      return (ServletWebServerFactory)this.getBeanFactory().getBean(beanNames[0], ServletWebServerFactory.class);
   }
}
웹 서버 팩토리 빈을 가져올 때는 ServletWebServerFactory.class 타입의 구현체 빈들을 확인해서, 만약 해당 타입의 빈이 없거나 2개 이상일 경우에는 에러를 발생 시킨다.
최종적으로 단 하나의 ServletWebServerFactory 구현체만을 반환한다.
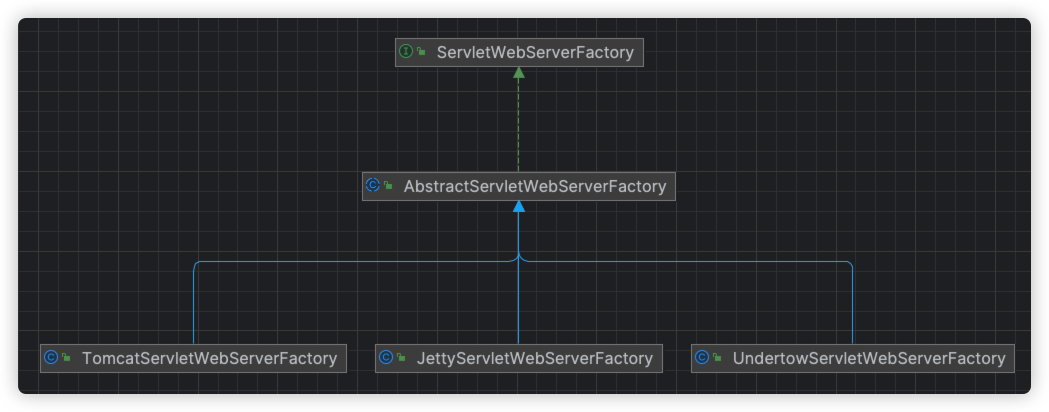
그렇다면 ServletWebServerFactory의 구현체는 총 3개인데 빈이 1개만 있을 때 정상적으로 동작하니, 결국 TomcatServletWebServerFactory를 제외한 나머지 웹 서버 팩토리는 존재하지 않아야 제대로 동작한다.
“해당 클래스가 정의는 되어있는데 어떻게 나머지 웹 서버 팩토리들은 빈으로 등록되지 않을까?”라는 생각 웹 서버 Auto Configuration 관련 코드를 찾아보았다.
ServletWebServerFactoryAutoConfiguration
@AutoConfiguration(
    after = {SslAutoConfiguration.class}
)
@AutoConfigureOrder(Integer.MIN_VALUE)
@ConditionalOnClass({ServletRequest.class})
@ConditionalOnWebApplication(
    type = Type.SERVLET
)
@EnableConfigurationProperties({ServerProperties.class})
@Import({
   BeanPostProcessorsRegistrar.class,
   ServletWebServerFactoryConfiguration.EmbeddedTomcat.class,
   ServletWebServerFactoryConfiguration.EmbeddedJetty.class,
   ServletWebServerFactoryConfiguration.EmbeddedUndertow.class
})
public class ServletWebServerFactoryAutoConfiguration {
   /* ... */
}
결론적으로 ServletWebServerFactoryAutoConfiguration에 @Import 어노테이션으로 각 서블릿 컨테이너의 설정 클래스에 정의된 빈들을 등록하는 과정에서 특정 서블릿 컨테이너의 빈만 등록되게 된다.
@Import로 가져오는 EmbbededTomcat, EmbeddedJetty, EmbeddedUndertow는 모두 ServletWebServerFactoryConfiguration 클래스의 내부 클래스로 정의되어 있다.
@Configuration(
   proxyBeanMethods = false
)
@ConditionalOnClass({Servlet.class, Tomcat.class, UpgradeProtocol.class})
@ConditionalOnMissingBean(
   value = {ServletWebServerFactory.class},
   search = SearchStrategy.CURRENT
)
static class EmbeddedTomcat {
   EmbeddedTomcat() {
   }

   @Bean
   TomcatServletWebServerFactory tomcatServletWebServerFactory(ObjectProvider<TomcatConnectorCustomizer> connectorCustomizers, ObjectProvider<TomcatContextCustomizer> contextCustomizers, ObjectProvider<TomcatProtocolHandlerCustomizer<?>> protocolHandlerCustomizers) {
      TomcatServletWebServerFactory factory = new TomcatServletWebServerFactory();
      factory.getTomcatConnectorCustomizers().addAll(connectorCustomizers.orderedStream().toList());
      factory.getTomcatContextCustomizers().addAll(contextCustomizers.orderedStream().toList());
      factory.getTomcatProtocolHandlerCustomizers().addAll(protocolHandlerCustomizers.orderedStream().toList());
      return factory;
   }
}
@Configuration(
   proxyBeanMethods = false
)
@ConditionalOnClass({Servlet.class, Server.class, Loader.class, WebAppContext.class})
@ConditionalOnMissingBean(
   value = {ServletWebServerFactory.class},
   search = SearchStrategy.CURRENT
)
static class EmbeddedJetty {
   EmbeddedJetty() {
   }

   @Bean
   JettyServletWebServerFactory jettyServletWebServerFactory(ObjectProvider<JettyServerCustomizer> serverCustomizers) {
      JettyServletWebServerFactory factory = new JettyServletWebServerFactory();
      factory.getServerCustomizers().addAll(serverCustomizers.orderedStream().toList());
      return factory;
   }
}
@Configuration(
   proxyBeanMethods = false
)
@ConditionalOnClass({Servlet.class, Undertow.class, SslClientAuthMode.class})
@ConditionalOnMissingBean(
   value = {ServletWebServerFactory.class},
   search = SearchStrategy.CURRENT
)
static class EmbeddedUndertow {
   EmbeddedUndertow() {
   }

   @Bean
   UndertowServletWebServerFactory undertowServletWebServerFactory(ObjectProvider<UndertowDeploymentInfoCustomizer> deploymentInfoCustomizers, ObjectProvider<UndertowBuilderCustomizer> builderCustomizers) {
      UndertowServletWebServerFactory factory = new UndertowServletWebServerFactory();
      factory.getDeploymentInfoCustomizers().addAll(deploymentInfoCustomizers.orderedStream().toList());
      factory.getBuilderCustomizers().addAll(builderCustomizers.orderedStream().toList());
      return factory;
   }

   @Bean
   UndertowServletWebServerFactoryCustomizer undertowServletWebServerFactoryCustomizer(ServerProperties serverProperties) {
      return new UndertowServletWebServerFactoryCustomizer(serverProperties);
   }
}
각 내장 서블릿 컨테이너 설정 클래스에서 ServetWebServerFactory의 구현체들을 Bean으로 등록하도록 정의되어 있다.
각 설정 클래스에 @ConditionalOnMissingBean(...) 어노테이션이 존재한다. 그 값인 ServletWebServerFactory가 이미 빈으로 등록되어 있는 경우 나머지 구현체가 등록되지 않도록 한다.
그런데 @ConditionalOnMissingBean(...) 어노테이션만 있다면 결국 3가지 설정 클래스 중 먼저 실행되는 것의 웹 서버 팩토리가 빈으로 등록되어 나머지 빈들은 등록되지 못할 것이다. 이를 방지하고자 선언되어 있는 것이 @ConditonalOnClass 어노테이션이다.
@ConditonalOnClass 어노테이션은 조건부 클래스로 설정된 클래스가 모두 존재해야지만 해당 클래스가 유효하게 동작하도록 한다.
EmbbededTomcat의 경우에는 정의된 3가지 클래스 Servlet.class, Tomcat.class, UpgradeProtocol.class가 모두 존재한다. 간단하게 cmd + 클릭으로도 해당 소스 클래스 파일로 이동 가능하다.
그러나, 나머지 설정 클래스의 어노테이션에 정의된 클래스를 확인해보니 아래와 같은 문구를 확인할 수 있다.
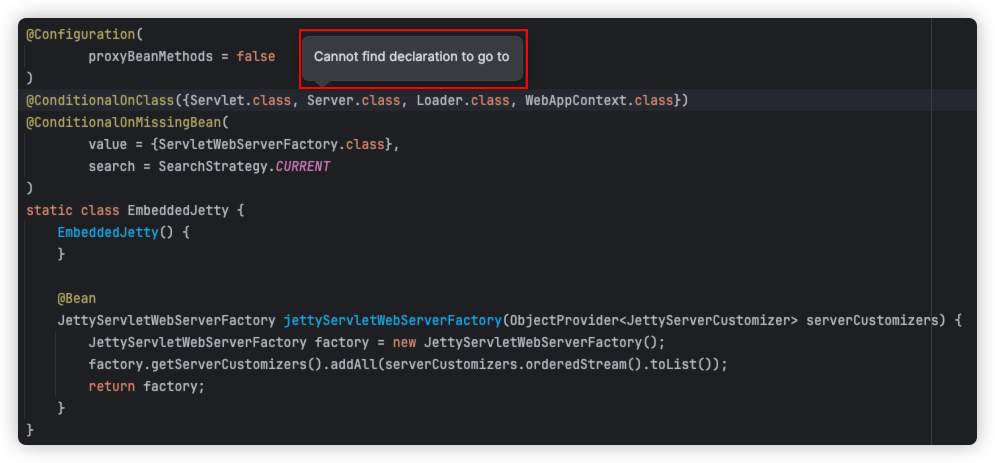
package org.springframework.boot.autoconfigure.web.servlet;

import io.undertow.Undertow;
import jakarta.servlet.Servlet;
import org.apache.catalina.startup.Tomcat;
import org.apache.coyote.UpgradeProtocol;
import org.eclipse.jetty.ee10.webapp.WebAppContext;
import org.eclipse.jetty.server.Server;
import org.eclipse.jetty.util.Loader;
// ...

@Configuration(
    proxyBeanMethods = false
)
class ServletWebServerFactoryConfiguration {
   /* ... */
}
“Cannot find declaration to go to” 해당 문구를 처음 보고 “도대체 해당 클래스 소스 파일이 없는데 어떻게 애플리케이션이 제대로 실행이 되는 것이며, spring-boot-autoconfigure가 빌드 될 때는 해당 클래스가 존재했을텐데 어떻게 spring-boot-autoconfigure 디펜던시를 주입받고 있는 현재 프로젝트에서는 해당 클래스 파일이 존재하지 않는 것이지?”라는 의문이 시작되었다.
서론이 길었지만, 해당 질문이 이 포스팅을 작성하게 된 계기이며 이 포스팅의 주제이기도 하다.
본론
앞서, 서론의 끝에서 가졌던 springboot-autoconfigure 디펜던시를 주입받고 있음에도 그 디펜던시가 의존하고 있는 undertow나 jetty와 같은 다른 디펜던시가 현재 프로젝트에 존재하지 않는지에 대한 궁금증을 풀어보고자 한다.
이를 알아보기 위해 springboot 깃허브를 찾아보았다. 해당 깃허브는 현재 프로젝트에서 사용하는 Spring Boot 3.3.x 버전을 기준이다.
1. SpringBoot Starter
스프링부트는 starter 모듈을 통해 여러 디펜던시 간 버전 관리를 지원하고, 모듈 성격에 맞는 의존성을 자동으로 구성하여 제공한다.
먼저 spring-boot-starter의 build.gradle을 통해 해당 모듈에서 주입되고 있는 의존성을 확인해보았다.
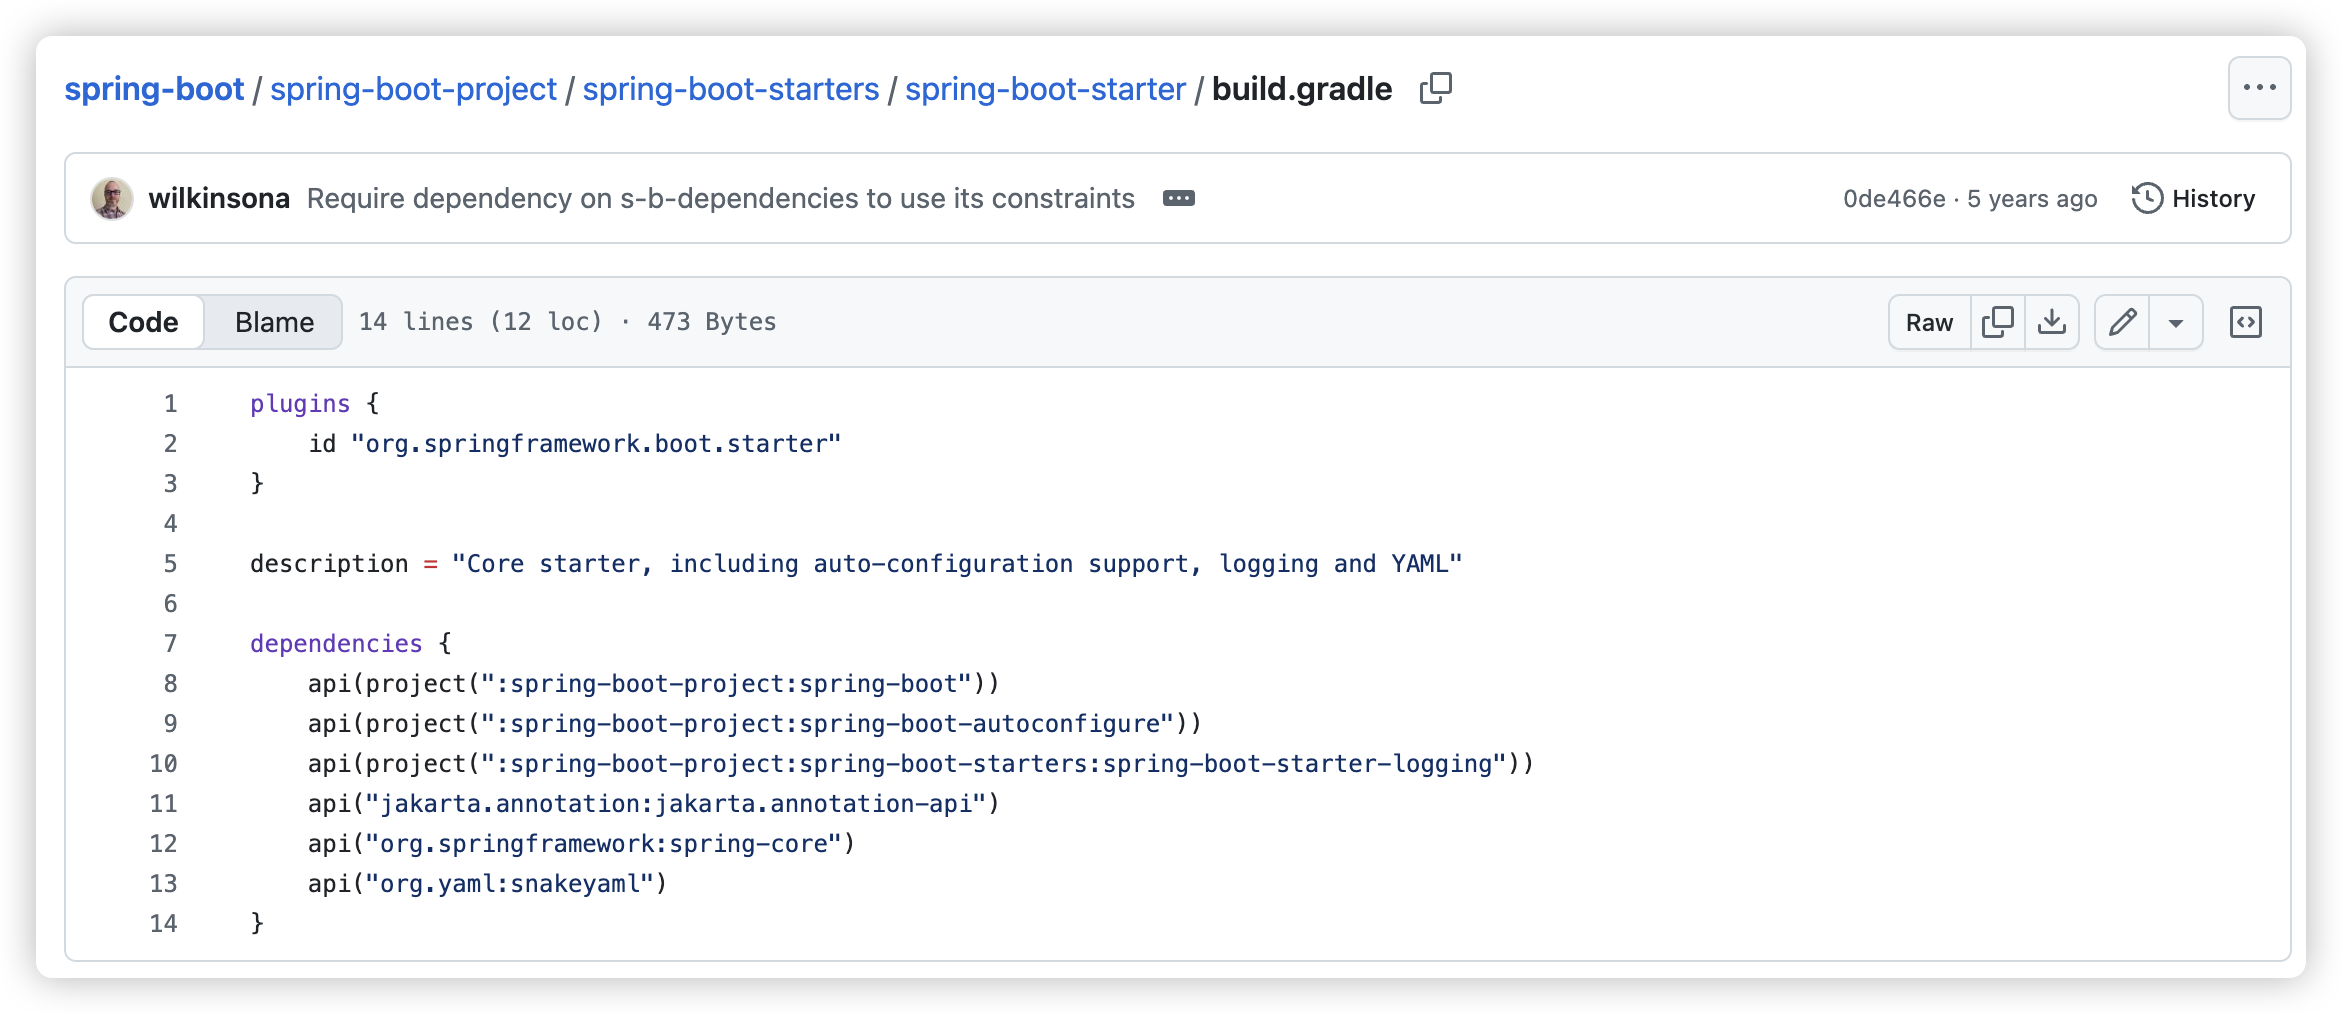
해당 파일에서 spring-boot-projects:spring-boot-autoconfigure 디펜던시가 주입되고 있는 것을 알 수 있다.
api
설정 파일을 보면 api(project(":spring-boot-projects:spring-boot-autoconfigure"))와 같이 api 키워드를 사용하여 디펜던시를 주입받고 있는데, 해당 키워드는 implementation과 달리 spring-boot-starter 디펜던시를 주입받는 다른 모듈에게 spring-boot-autoconfigure 의존성이 전이되어 해당 모듈의 클래스 경로(compileClasspath)에도 추가되도록 하는 키워드이다.
2. SpringBoot Autoconfigure
// spring-boot-autoconfigure build.gradle
   dependencies {
      api(project(":spring-boot-project:spring-boot"))
      // ...
      optional("io.undertow:undertow-servlet")
      optional("io.undertow:undertow-websockets-jsr")
      // ...
      optional("org.apache.tomcat.embed:tomcat-embed-core")
      optional("org.apache.tomcat.embed:tomcat-embed-el")
      optional("org.apache.tomcat.embed:tomcat-embed-websocket")
      optional("org.apache.tomcat:tomcat-jdbc")
      // ...
      optional("org.eclipse.jetty.ee10:jetty-ee10-webapp")
      optional("org.eclipse.jetty:jetty-reactive-httpclient")
      optional("org.eclipse.jetty.ee10.websocket:jetty-ee10-websocket-jakarta-server")
      optional("org.eclipse.jetty.ee10.websocket:jetty-ee10-websocket-jetty-server")
      // ...
   }
spring-boot-autoconfigure의 build.gradle에서는 ServletWebServerFactoryConfiguration에서 import하던 클래스들이 포함된 디펜던시가 설정되어 있는 것을 확인할 수 있다. 따라서, spring-boot-autoconfigure을 빌드하여 jar 파일을 만드는 시점에는 Undertow나 Jetty 관련 클래스 파일이 존재하였다는 것을 알 수 있다.
그러나, 해당 부분에서 디펜던시를 주입받는 부분의 키워드는 optional이다.
optional
optional은 의존성을 선택적으로 추가할 때만 사용하며, api와는 다르게 의존성이 전이 되지 않는다. 주로 특정 라이브러리와 연동하여 부가 기능을 제공하는 경우에 많이 사용한다.
해당 설명에서 왜 SpringBoot를 사용하는 현재 프로젝트에서 Undertow나 Jetty 관련 클래스 파일들이 존재하지 않는지에 대한 이유를 알 수 있다.
3. SpringBoot Starter Web
springboot-autoconfigure의 build.gradle에서 Tomcat 디펜던시도 optional 키워드로 주입받고 있어 기본적으로는 클래스 파일들이 로드되지 않는다.
그렇다면 Tomcat 관련 디펜던시가 주입되는 부분은 springboot-starter-web을 참고하면 알 수 있다.
우리는 WAS 애플리케이션 목적으로 스프링 애플리케이션을 만들 때 SpringBoot와 Spring Web 디펜던시를 사용하여 생성하곤한다. 이 때, 사용되는 것이 springboot-starter-web 디펜던시이다.
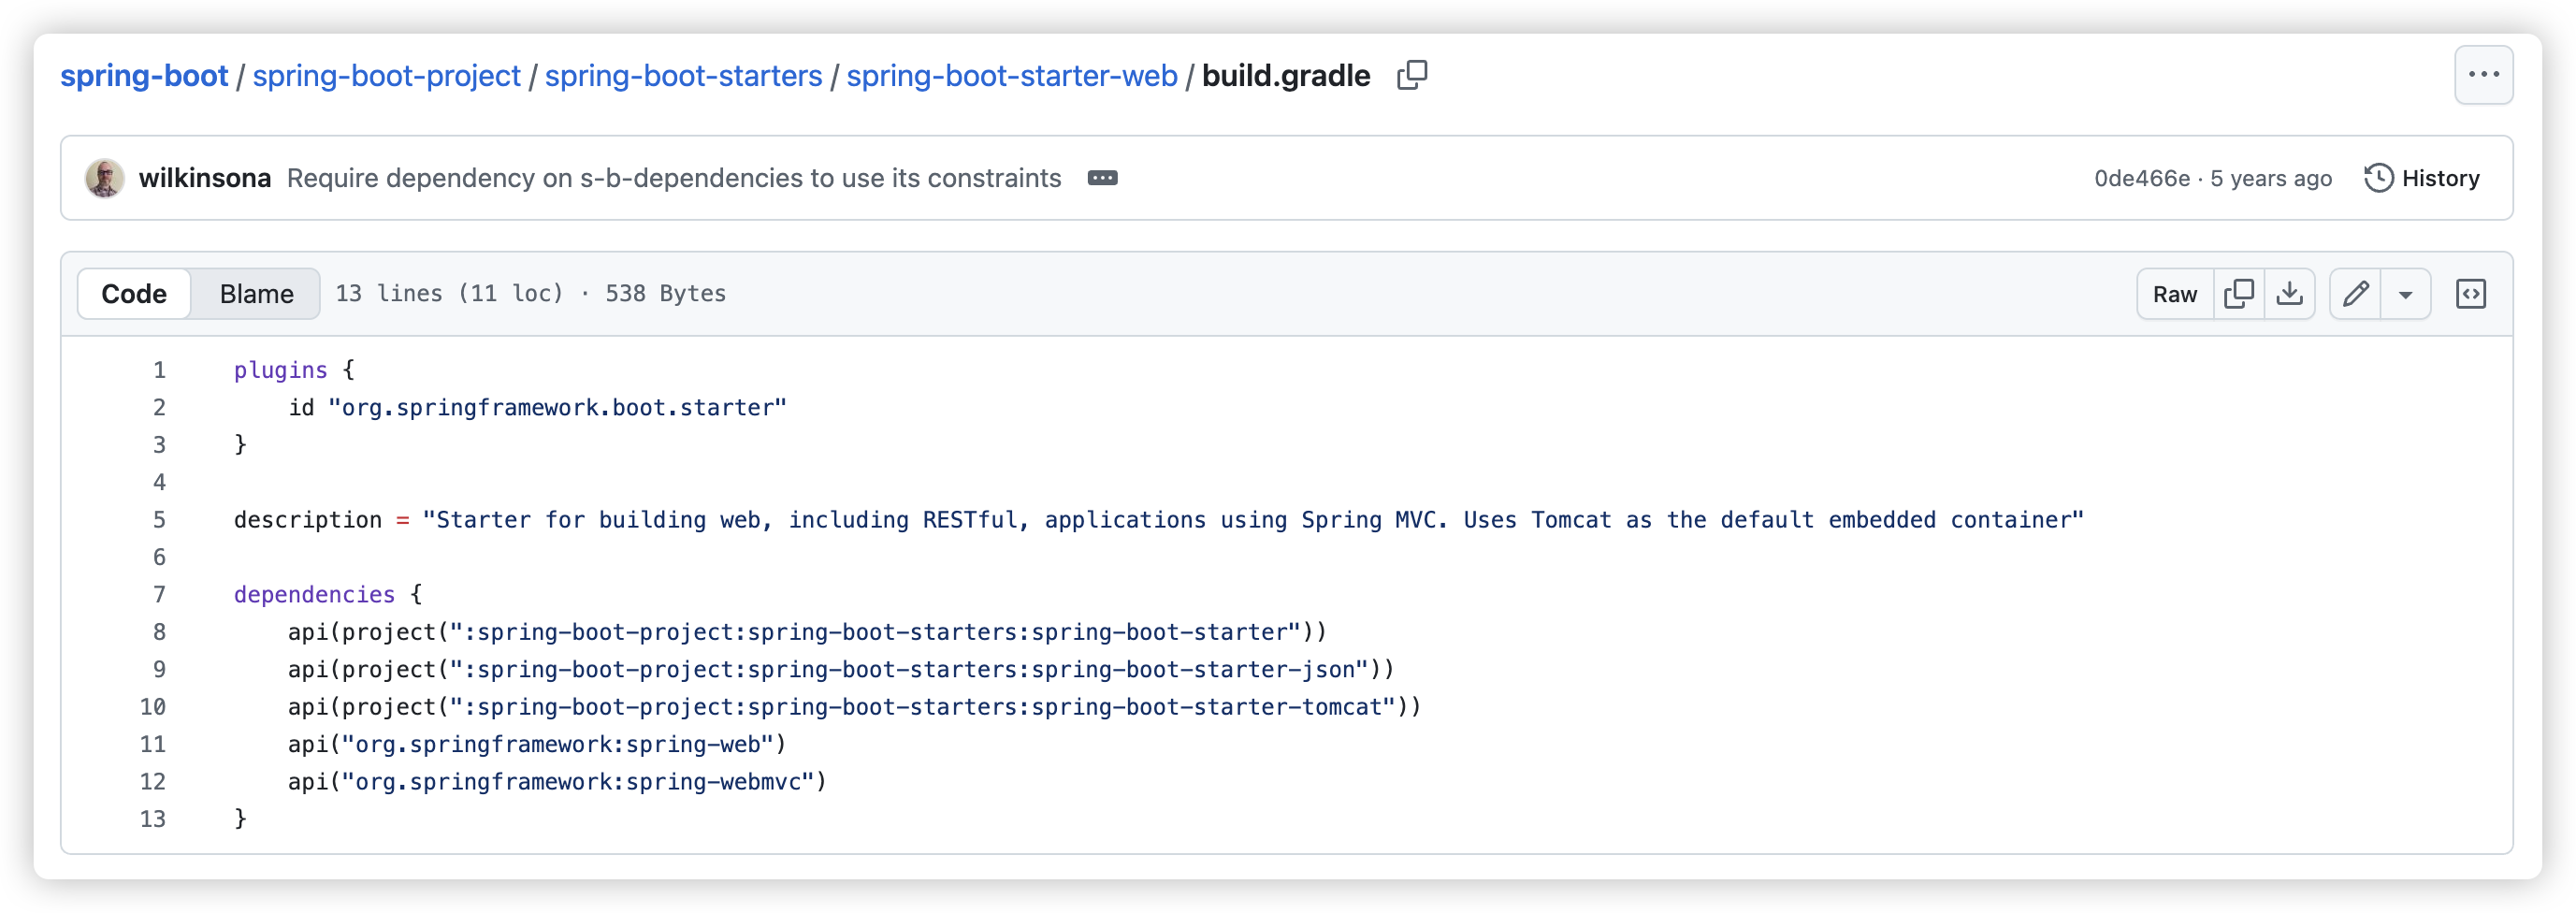
해당 설정 파일에서 springboot-starter-tomcat 디펜던시를 주입받고 있음을 알 수 있다.
4. SpringBoot Starter Tomcat
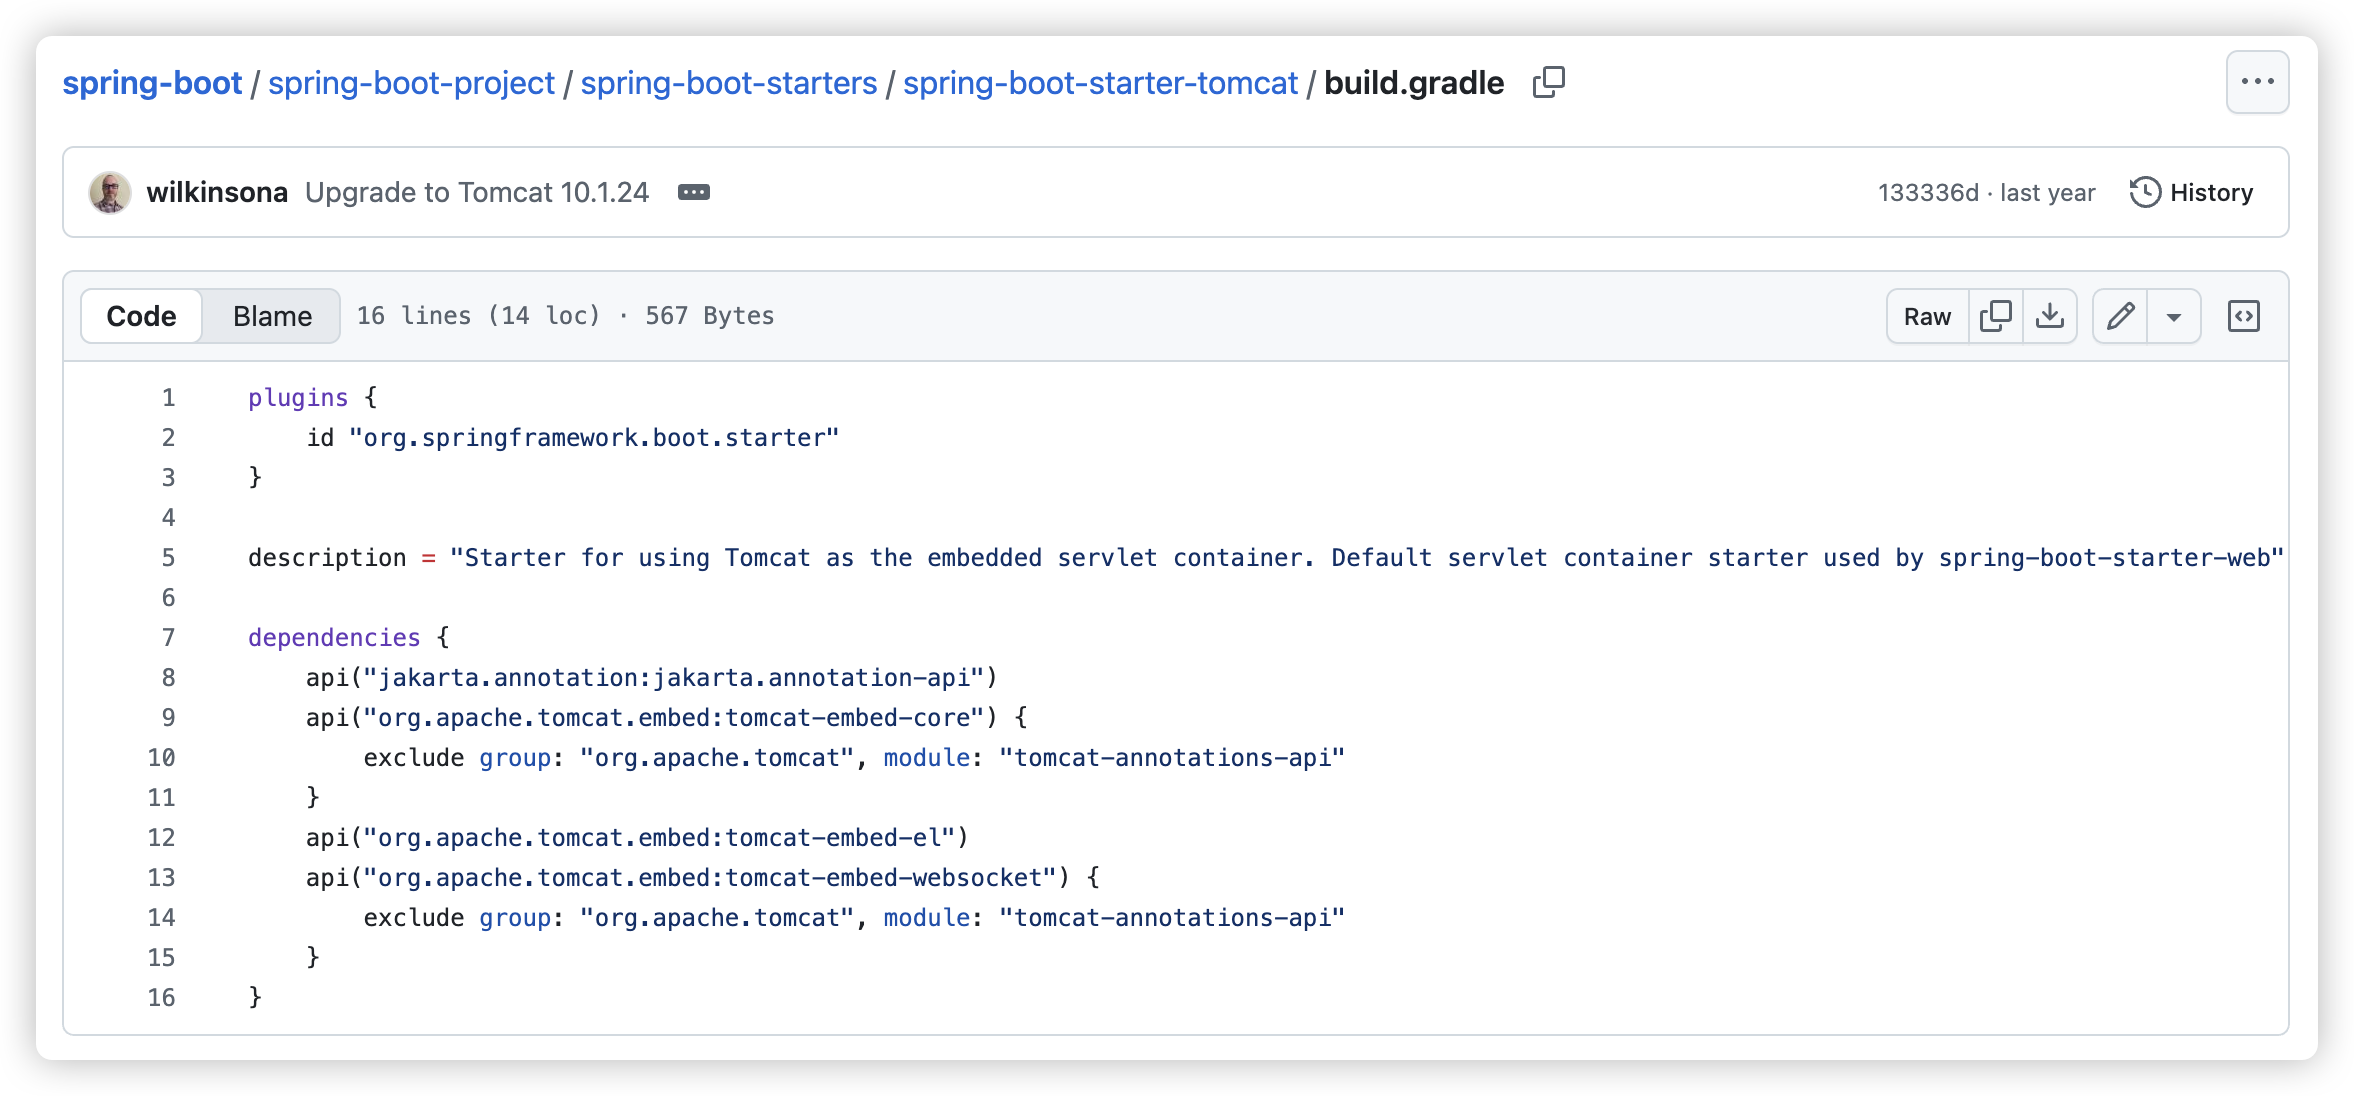
spring-boot-starter-tomcat의 build.gradle 파일 내에서 tomcat-embed-core 디펜던시를 주입받고 있다.

따라서, Tomcat과 관련된 Tomcat.class는 현재 프로젝트에 존재할 수 있게되는 것이다.
Tomcat이 아닌 Jetty 사용
위 설정 파일에서 알 수 있듯이 spring-boot-starter-web에서는 기본적으로 springboot-starter-tomcat 디펜던시를 주입받고 이를 전이하고 있다. 따라서, Jetty를 WAS로 사용하려는 경우에 아래와 같이 Tomcat 의존성을 제외시켜주어야 한다.
dependencies {
    ...

    implementation ('org.springframework.boot:spring-boot-starter-web') {
        exclude module: 'spring-boot-starter-tomcat'
    }

    // 추가
    implementation ('org.springframework.boot:spring-boot-starter-jetty')

    ...
}
결론
본 포스팅을 작성하기 전 AOP의 동작 원리에 대해 알아보고자 하였으나 어쩌다보니 빈의 생성과정을 찾아보게 되었고, 더 나아가 스프링부트의 자동 설정(auto configuration)과 디펜던시 주입 과정이라는 근본적인 질문에 닿게 되었다. 의존성이 전이되는 api 키워드 외에도 optional 키워드를 사용해 의존성 전이를 막아 특정 모듈 내에 필요한 의존성만 주입 받도록 설정할 수 있다는 것이 그 해답이었다.
결국 spring-boot-autoconfigure은 여러가지 상황을 대비한 자동 설정의 설계도 역할이며, 실제 이를 만드는 것은 각 JAR 파일이고 사용자가 주입한 외부 의존성에 의해 결정나는 것이었다. @ConditonalOnXXX 어노테이션과 결합하여 빈 등록 등의 과정을 클래스 존재 여부에 따라 제어한다는 것이 인상깊었다.
처음에는 “클래스 파일이 존재하지 않는데 어떻게 애플리케이션이 구동될 수 있지?”라는 질문으로 시작했었지만, 현재는 JAR 파일로 해당 디펜던시를 이미 주입받고 있는 상황에서 애플리케이션의 구동되는 것은 당연하다는 생각이 든다.
현재는 프로젝트에 적용된 SpringBoot 3.3.x 버전을 기준으로 깃허브 등을 찾아보았지만, 스프링부트의 버전이 업그레이드되면서 사용되는 클래스가 사라지는 등 변화가 존재한다. 그러나, 이처럼 컴파일 시점과 런타임 시점에서 의존성을 분리하여 필요한 Bean들만 로드해 관리하는 동작 원리는 크게 변하지 않았다.
단순 내부 코드의 동작을 아는 것을 넘어, 의존성 주입의 배경에 있는 이러한 동작 원리등을 알아보는 것도 중요한 경험이 되었다.