AWS EC2 Docker를 통한 HTTPS 적용
DESCRIPTION
종합 설계 수업에서 '여행 기록 관리 플랫폼' 프로젝트를 진행하며 백엔드 서버 https 적용을 담당하게 되었다. docker-compose를 통한 Certbot 환경 구성 및 https 적용 과정을 기록하고자 해당 포스팅을 작성하게 되었다.
서론
필자는 종합 설계 수업에서 ‘여행 기록 관리 플랫폼’ 프로젝트 백엔드 개발 파트를 담당하게 되었다. 쿠키를 통한 리프레시 토큰 전달 등의 이유와 더불어 통신의 안전성을 높이기 위하여 HTTPS 프로토콜을 적용하기로 결정하였다. 이전에 작성했던 AWS EC2 도메인 및 HTTPS 적용 포스팅에서 EC2 인스턴스에 Nginx와 Certbot을 직접 설치하여 HTTPS 프로토콜을 적용하였다. 이번 프로젝트를 같이하는 팀원 분이 Docker를 통해 Certbot 설치가 가능하고 인증서 발급을 자동화할 수 있다는 추천을 해주셔서 백엔드 서버 https 프로토콜 적용을 맡아서 진행하기로 하였다.
Environment
- EC2: t2.micro
- Platform: Linux/Unix
- Nginx: apt를 통한 설치
- Certbot: docker-compose를 통한 설치
Nginx는 인스턴스 내에 직접 설치하여 설정을 진행한다. 기타 자료들을 참고하면 Nginx또한 도커로 실행하는 예제들이 많으나, 파일 경로 등 추가 설정을 편하게 진행하기 위하여 직접 설치한다.
현재 EC2 인스턴스에는 백엔드 서버 애플리케이션(SpringBoot), MongoDB, Redis 컨테이너가 docker-compose로 실행되고 있다. 따라서, Certbot은 docker-compose를 통해 추가적으로 실행한다.
또한, 도메인 DOMAIN.com 구매 후, 프론트엔드 AWS Route53 내 호스트 영역을 생성하였다. 백엔드에서는 api.DOMAIN.com 호스트 영역 생성 후 해당 영역의 네임 서버를 프론트엔드 Route53에 등록한 상태이다. 해당 내용은 이전 포스팅과 동일하다.
Setting
Nginx
sudo apt install nginx -y
Nginx conf
Nginx에서는 .conf 파일에 가상 호스트에 대한 설정 작성할 수 있다.
conf.d vs site-available
Nginx에서 가상 호스트에 대한 설정을 2가지 방법이 있다.
- /etc/nginx/conf.d/ 디렉토리 내 ***.conf 파일 작성
- /etc/nginx/sites-available/ 디렉토리 내 ***.conf 파일 작성 후 /etc/nginx/sites-enabled 디렉토리 내 심볼릭 링크 생성
위 2가지 방법 중 어느 방법을 선택하든지 설정은 동일하게 적용이 된다.
우선, conf.d/ 디렉토리 내 작성된 설정 파일은 Nginx에 무조건 적용된다.
설정을 선택적으로 적용시키는 방법은 sites-available/ 디렉토리에 설정 파일 작성 후, 적용하고 싶은 가상 호스트 설정만 sites-enabled/ 내 심볼릭 링크로 설정하는 것이다.
대부분의 프로젝트에서는 하나의 설정 파일에 단일 서버 애플리케이션에 대한 설정만 진행하기 때문에 어떠한 방법을 선택하든지 큰 상관이 없다.
필자는 후자의 방법을 선택하여 설정을 진행한다.
myapp.conf 작성
server {
    listen 80;                      # IPv4 80포트
    listen [::]:80;                 # IPv6 80포트

    server_name api.DOMAIN.com;     # 도메인 설정

    location /.well-known/acme-challenge/ {
        allow all;
        root /var/www/certbot;
    }
}
sites-available/ 디렉토리 내 해당 설정 파일을 작성한다.
현재 가상 호스트 설정은 인증서 발급을 위해 80 포트(http)를 개방하고, 구매한 도메인 설정 후 ./well-known/acme-challenge/ 경로에 대한 요청을 허용한다. 인증서 발급 후 해당 내용은 교체할 예정이다.
심볼릭 링크 생성
sudo ln -s /etc/nginx/sites-available/myapp.conf /etc/nginx/sites-enabled/
심볼릭 링크를 생성하여 Nginx에서 해당 설정을 적용하도록 한다.
Nginx 재시작
sudo systemctl restart nginx
Certbot (docker-compose)
version: '3.8'

services:

  # 생략

  certbot:
    image: certbot/certbot
    volumes:
      - ./nginx/certbot/conf:/etc/letsencrypt
      - /var/www/certbot:/var/www/certbot
    restart: unless-stopped
    entrypoint: "/bin/sh -c 'trap exit TERM; while :; do certbot renew; sleep 12h & wait $${!}; done;'"
    networks:
      - network

networks:
  network:
certbot/certbot 이미지를 통해 certbot을 실행한다. volumes에서 볼륨 마운트를 진행한다. 인스턴스의 ./nginx/certbot/conf 디렉토리와 컨테이너 상의 /etc/letsencrypt, 인스턴스의 /var/www/cerbot 디렉토리와 컨테이너 상의 /var/www/certbot을 마운트한다.
Let’s Encrypt로 발급받은 SSL 인증서는 만료기한이 90일이다. docker-compose를 통해 컨테이너 실행 시 인증서 갱신 확인 및 자동 갱신을 위한 명령어를 entrypoint에 작성한다.
. (home directory)
├── docker-compose.yml
└── nginx
    └── certbot
        └── conf
위와 같은 디렉토리 구조가 생기게 된다. /var/www/certbot 디렉토리 구조는 생략한다.
Certbot 실행
docker-compose up -d
도커 컴포즈를 실행시켜 Certbot을 실행한다.
docker exec -it ubuntu-certbot-1 sh # Certbot 컨테이너 이름 입력
# Certbot Container 내
certbot certonly --webroot --webroot-path /var/www/certbot/ -d api.DOMAIN.com
# Certbot Container 내
Saving debug log to /var/log/letsencrypt/letsencrypt.log
Enter email address or hit Enter to skip.
 (Enter 'c' to cancel): {이메일 입력}

- - - - - - - - - - - - - - - - - - - - - - - - - - - - - - - - - - - - - - - -
Please read the Terms of Service at:
https://letsencrypt.org/documents/LE-SA-v1.5-February-24-2025.pdf
You must agree in order to register with the ACME server. Do you agree?
- - - - - - - - - - - - - - - - - - - - - - - - - - - - - - - - - - - - - - - -
(Y)es/(N)o: yes

- - - - - - - - - - - - - - - - - - - - - - - - - - - - - - - - - - - - - - - -
Would you be willing, once your first certificate is successfully issued, to
share your email address with the Electronic Frontier Foundation, a founding
partner of the Let's Encrypt project and the non-profit organization that
develops Certbot? We'd like to send you email about our work encrypting the web,
EFF news, campaigns, and ways to support digital freedom.
- - - - - - - - - - - - - - - - - - - - - - - - - - - - - - - - - - - - - - - -
(Y)es/(N)o: yes
Account registered.
Requesting a certificate for api.DOMAIN.com

... 생략
Certbot 컨테이너에 접속하여 인증서 발급을 진행한다.
. (home directory)
├── docker-compose.yml
└── nginx
    └── certbot
        └── conf
            ├── accounts
            ├── renewal
            └── renewal-hooks
인증서 발급 후 디렉토리 구조는 아래와 같이 설정된다.
init-letsencrypt
init-letsencrypt는 docker-compose 환경에서 Certbot을 통한 인증서 발급 및 갱신을 지원하는 쉘 커맨드 파일 오픈소스이다.
해당 깃허브 내에서 init-letsencrypt.sh 파일 및 Nginx 설정 파일도 확인 가능하다.
1. init-letsencrypt Repository Clone
git clone https://github.com/wmnnd/nginx-certbot.git
2. Edit init-letsencrypt.sh
vim init-letsencrypt.sh
해당 리포지토리를 클론한 뒤 vim 에디터를 통하여 init-letsencrypt.sh 파일을 수정한다.
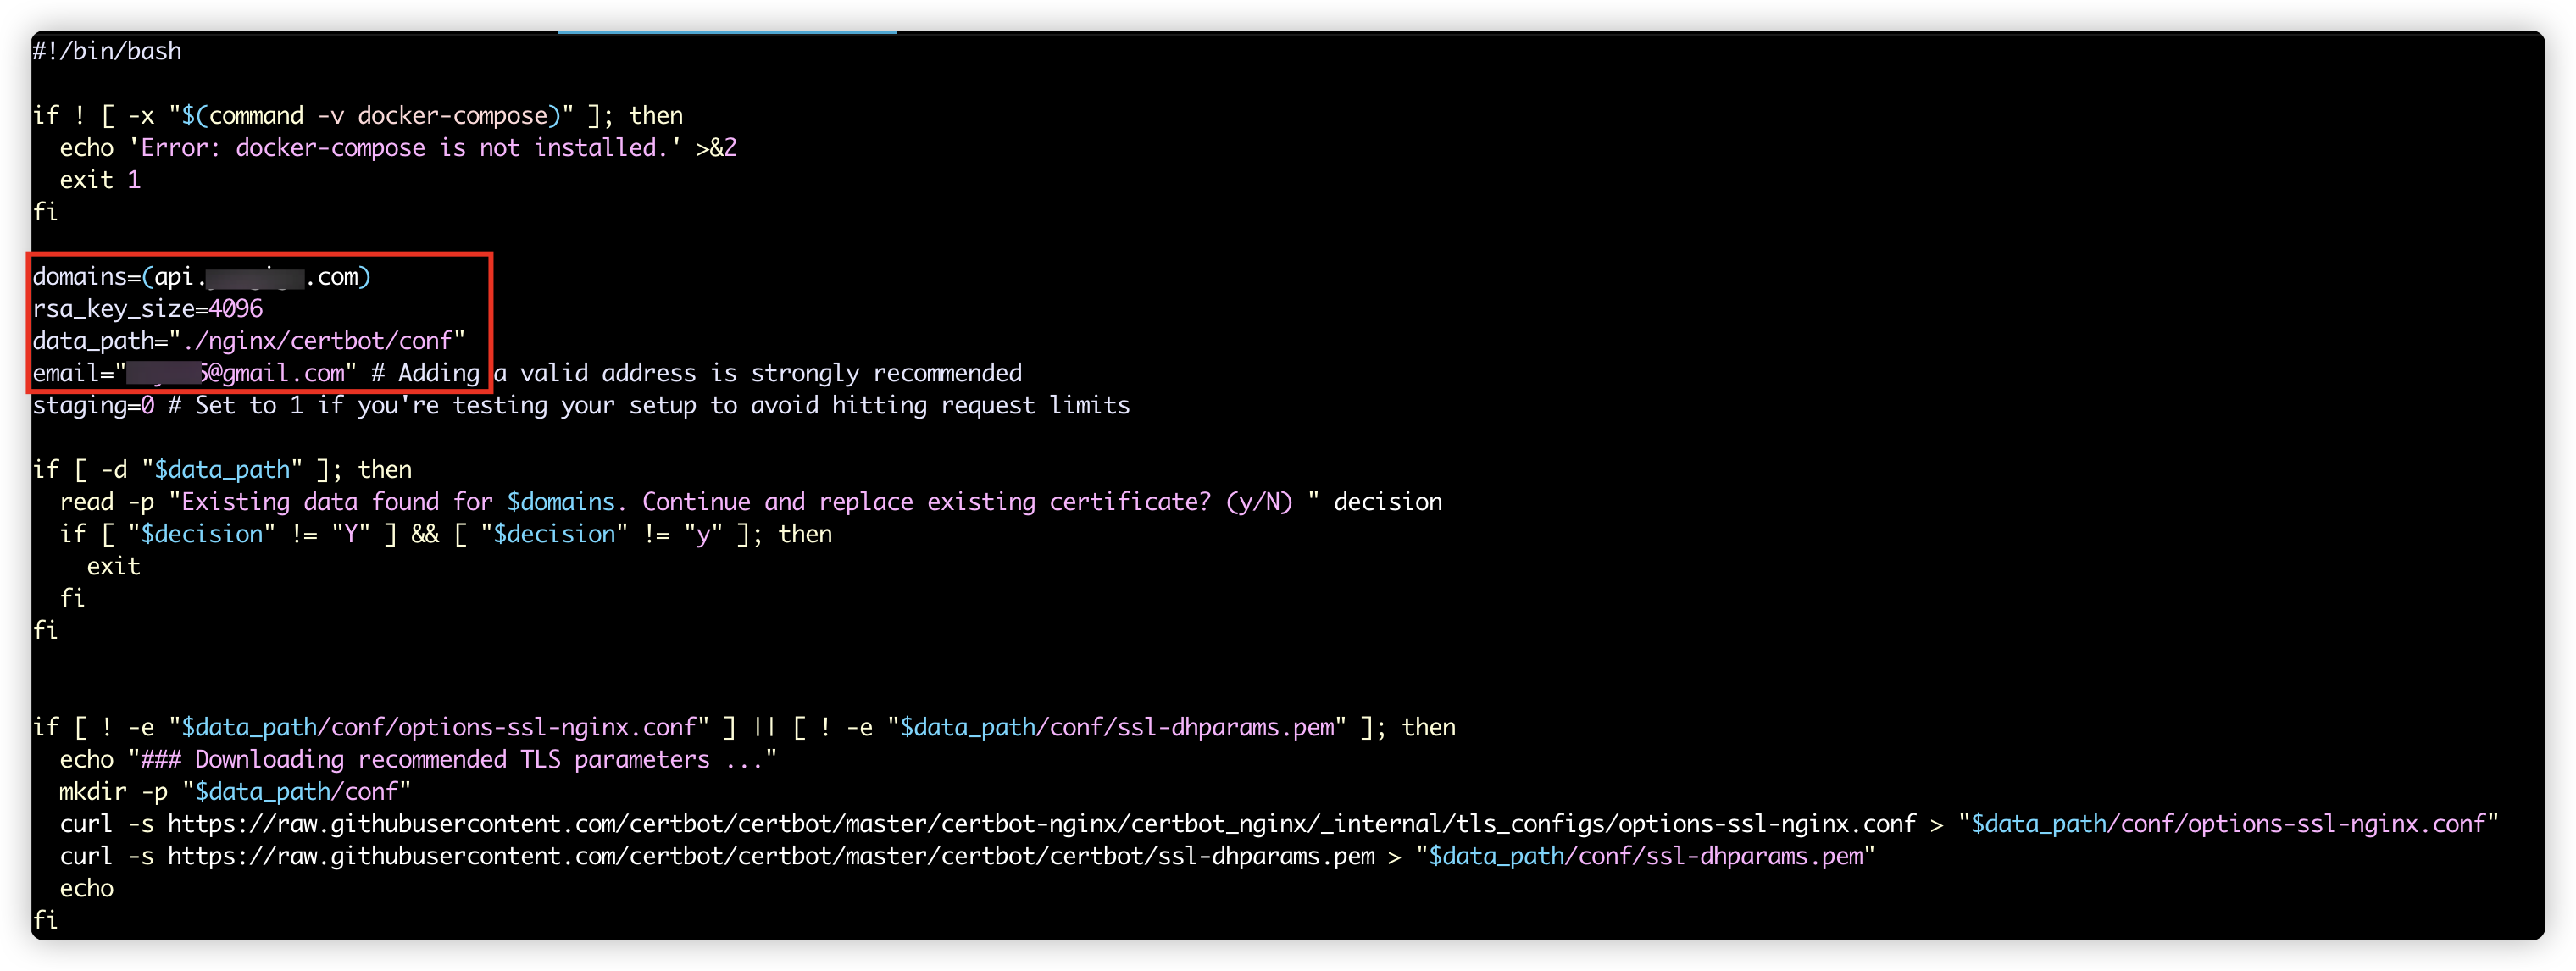
해당 파일에서 수정해야할 부분은 domains, data_path, email 부분이다.
domains와 email은 Certbot에서 등록한 이메일과 도메인을 기입하면 된다. data_path는 사진 아래의 options-ssl-nginx.conf, ssl-dhparams.pem 키를 발급받는 등의 위치를 지정해주는 것이다.
docker-compose.yml에서 마운트했던 경로인 ./nginx/certbot/conf로 지정해준다.
. (home directory)
├── docker-compose.yml
├── init-letsencrypt.sh    # nginx-certbot repository의 init-letsencrypt.sh를 이동 copy
├── nginx
│   └── certbot
│       └── conf
│           ├── accounts  [error opening dir]
│           ├── renewal
│           └── renewal-hooks
└── nginx-certbot
    ├── LICENSE
    ├── README.md
    ├── data
    │   └── nginx
    │       └── app.conf
    ├── docker-compose.yml
    └── init-letsencrypt.sh
앞서, init-letsencrypt.sh에서 data_path를 현재 디렉토리 기준으로 설정하였기 때문에, init-letsencrypt.sh가 클론한 리포지토리(nginx-certbot/) 내에 있다면 홈 디렉토리로 이동해준다.
./init-letsencrypt.sh
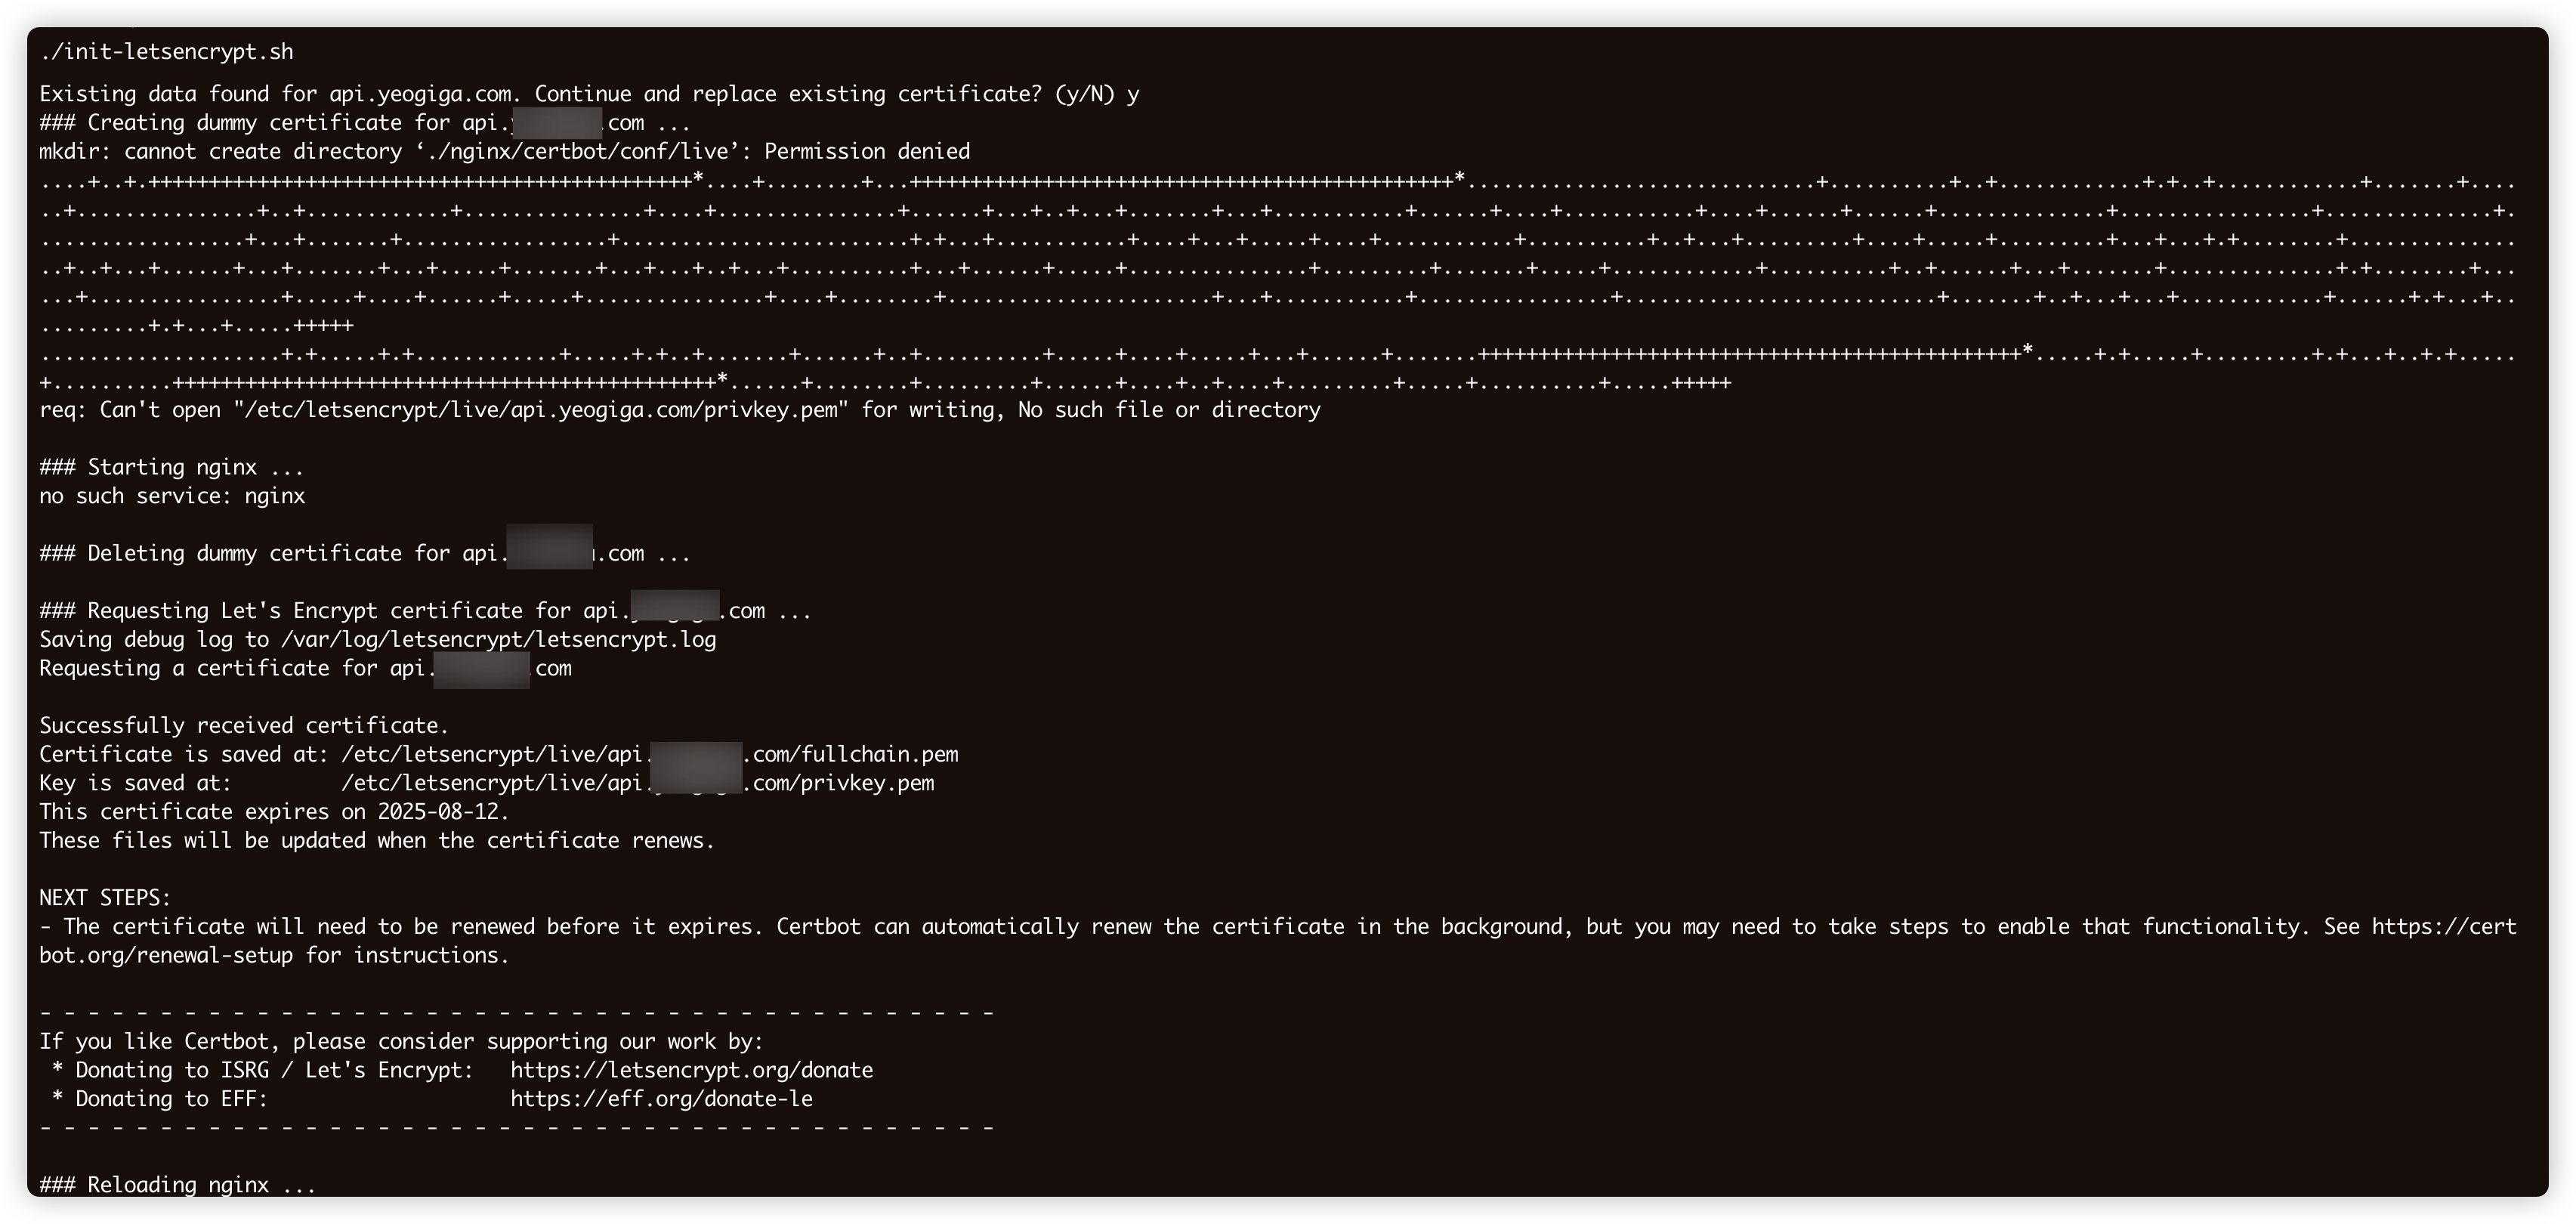
init-letsencrypt.sh 스크립트를 실행시키면 위와 같이 성공했다는 메시지가 출력된다. 이후 pem 키를 발급받았기 때문에 디렉토리는 아래와 같이 설정된다.
. (home directory)
├── docker-compose.yml
├── init-letsencrypt.sh
├── nginx
│   └── certbot
│       └── conf
│           ├── accounts
│           ├── archive
│           ├── live                    # https 설정위한 인증서 및 키 위치
│           ├── options-ssl-nginx.conf
│           ├── renewal
│           ├── renewal-hooks
│           └── ssl-dhparams.pem
└── nginx-certbot
이 떄 conf와 pem 파일이 제대로 설치가 안 된다면 아래 명령어를 통해 다운받을 수 있으며 위치는 ./nginx/certbot/conf로 이동해주어야 한다.
sudo curl -o ./nginx/certbot/conf/ssl-dhparams.pem https://raw.githubusercontent.com/certbot/certbot/master/certbot/certbot/ssl-dhparams.pem
sudo curl -o ./nginx/certbot/conf/options-ssl-nginx.conf https://raw.githubusercontent.com/certbot/certbot/master/certbot-nginx/certbot_nginx/_internal/tls_configs/options-ssl-nginx.conf

# 또는
sudo curl -s https://raw.githubusercontent.com/certbot/certbot/master/certbot-nginx/certbot_nginx/_internal/tls_configs/options-ssl-nginx.conf > "./nginx/certbot/conf/options-ssl-nginx.conf"
myapp.conf 수정
인증서 발급이 완료되었으니 해당 인증서를 통해 https 설정을 진행해주어야 한다.
아까 설정하였던 myapp.conf의 내용을 아래와 같이 수정해준다.
server {
    listen 80;
    server_name api.DOMAIN.com;

    location /.well-known/acme-challenge/ {
        root /var/www/certbot;
        allow all;
    }

    location / {
        return 301 https://$host$request_uri;   # http 요청의 경우에는 https로 리다이렉트
    }
}

server {
    listen 443 ssl;
    server_name api.DOMAIN.com;

    ssl_certificate /home/ubuntu/nginx/certbot/conf/live/api.yeogiga.com/fullchain.pem;
    ssl_certificate_key /home/ubuntu/nginx/certbot/conf/live/api.yeogiga.com/privkey.pem;
    include /home/ubuntu/nginx/certbot/conf/options-ssl-nginx.conf;
    ssl_dhparam /home/ubuntu/nginx/certbot/conf/ssl-dhparams.pem;

    location /.well-known/acme-challenge/ {
        root /var/www/certbot;
        allow all;
    }

    location / {
        proxy_pass http://127.0.0.1:8080;   # https 요청의 경우에는 SpringBoot Port Forwarding
        proxy_set_header Host $host;
        proxy_set_header X-Real-IP $remote_addr;
        proxy_set_header X-Forwarded-For $proxy_add_x_forwarded_for;
        proxy_set_header X-Forwarded-Proto $scheme;
    }
}
또한, nginx-certbot 리포지토리 내에 있는 app.conf 예제 코드를 복사해서 사용하여도 된다.
docker-compose의 Certbot을 통해 발급받은 인증서는 live/ 경로에 설정되기 때문에 앞서 설정한 경로를 기준으로 인증서 위치를 설정하여 준다. 위 설정이 완료되면 Nginx를 재시작한다.
sudo systemctl restart nginx
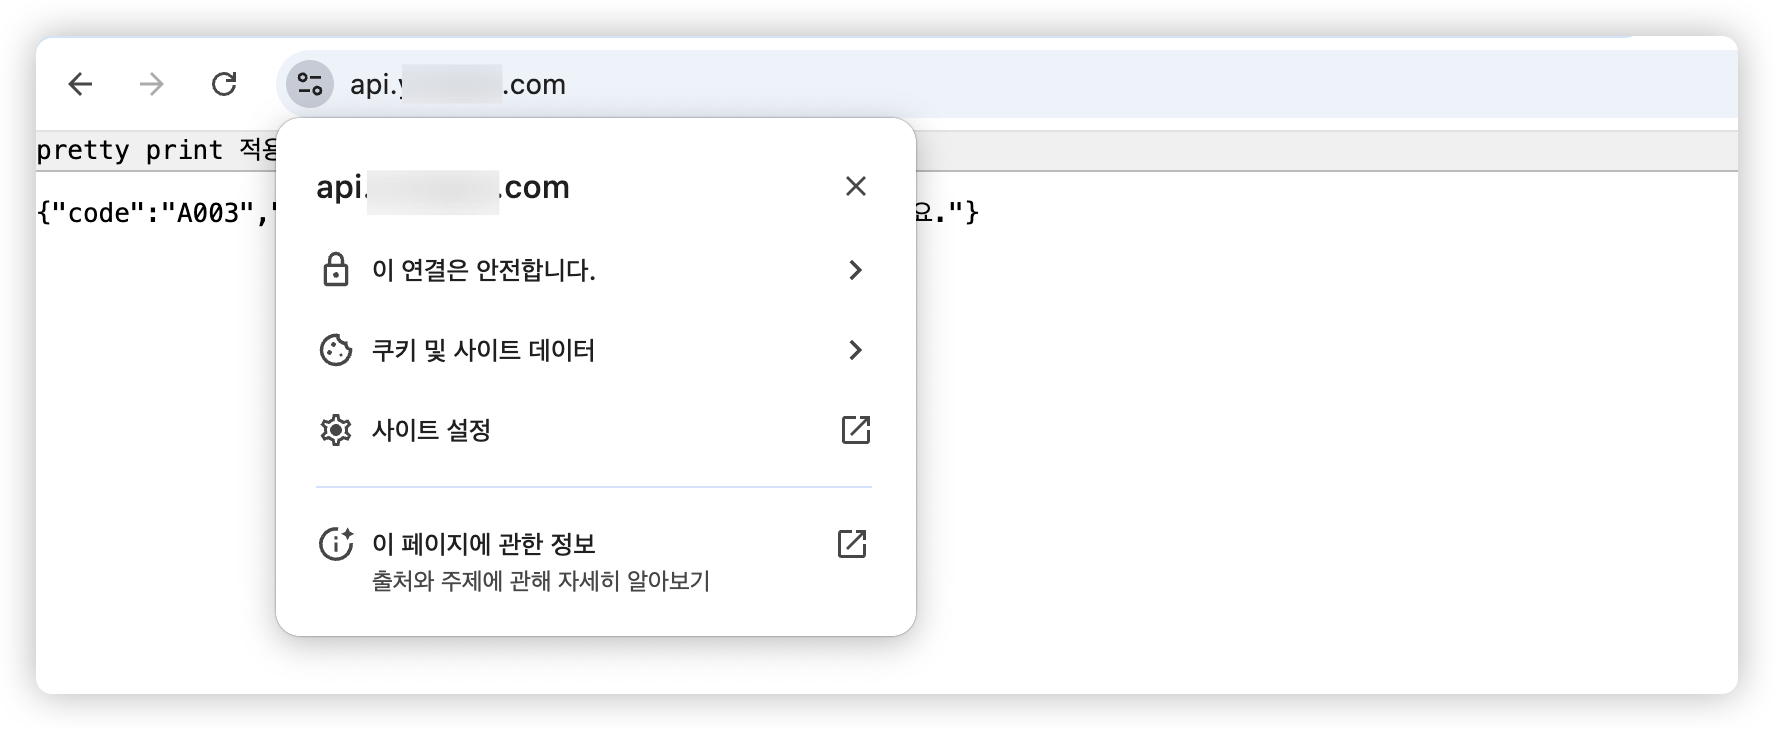
이후 https://api.DOMAIN.com에 접속하면 아래와 같이 https 설정이 완료된 것을 확인할 수 있다.
crontab을 통한 Nginx 재시작 설정
앞서 인증서의 만료 기한이 90일 이기에 docker-compose에 명령어를 작성하여 12시간마다 인증서 갱신 가능 여부를 확인하고 갱신을 진행하도록 설정하였다.
인증서가 갱신될 경우 pem 키의 파일명은 같으나 내용 전혀 다른 파일로 바뀌기 때문에 Nginx를 재시작해줘야한다.
따라서, 리눅스에서 제공하는 crontab을 통하여 매일 자정에 Nginx를 재시작한다.
sudo crontab -u root -e
위 명령어를 통하여 root 유저에 대한 crontab 설정 파일에 진입한다.
0 0 * * * systemctl restart nginx
매일 자정에 Nginx를 재시작하도록 설정한다.